Real-Time Voice Intercom for Field and Site Teams
The hardest part of site work is not the work. It is getting a message to the ri...
 HappyLab shared on Oct 12, 2026HappyLabshared on Oct 15, 2026
A printed label reads BC: 8.7 — except the colon is missing its lower dot.
A defect that small is invisible to the eye at line speed. It is also a label that should never ship: the parameter lost part of a character, and on a medical or regulated product that is a compliance problem, not a cosmetic one.
The usual answer is a person, a good eye and a lot of patience. That has three limits that more people do not fix: it misses the small ones, it cannot keep up with the line, and it is inconsistent — two inspectors, two standards, and no record of what was checked.
HappyLab Label Print Inspection compares every label against your master template and scores it, pixel by pixel. It is the machine equivalent of a “spot the difference” game — the difference being that one picture is your approved sample and the other is a label coming off the line right now.
TIP
New global site. The tool interface is currently in Chinese while we finish the English build — it ships in the next few weeks. The inspection engine itself is language-independent; tell us what you print and we will help you set up a template: sales@happylab.me.
In the game, the two pictures are almost identical, and any difference is the answer. On a real label, that assumption breaks immediately.
A label carries two kinds of content at once: parts that never change, and parts that change on every single label.
| Field | Label A | Label B | Label C |
|---|---|---|---|
| Power (PWR) | -2.00 | -8.00 | -2.00 |
| Expiry (EXP) | 2030/05 | 2030/06 | 2030/05 |
| Base curve (BC) | 8.7 | 14.0 | 8.7 |
| Diameter (DIA) | 14.0 | 8.0 | 14.0 |
Compare the whole image pixel by pixel and every label raises a false alarm in those regions — because the values are supposed to differ. Run that as your inspection and you reject good product all day.
The core problem
The hard part of label inspection is not comparing two images. It is that half of the image is meant to be different on every label. A tool that does not understand this is worse than useless on a production line.
The label is split into two kinds of region, and each is judged on its own terms.
| Region type | What it holds | How it is checked |
|---|---|---|
| Static | Field labels, headings, borders, decoration | Strict pixel-level template comparison — nothing is allowed to differ |
| Dynamic | The printed values: power, base curve, diameter, batch, date | Not “is the content right?” but “is it printed well?“ — ink density, edge sharpness, stroke completeness, contrast |
The dynamic region is expected to change, so it is never compared for content. It is scored for print quality instead. That one distinction is what makes template comparison work on a real label — and it can be learned automatically: compare several good labels and the pixels that never move are static, the ones that always move are dynamic.
The engine handles “is it printed well”; OCR and a rule check handle “is it the right value”; the static/dynamic split decides where to be strict and where to be flexible.
Both routes exist. For printed labels they are not equal.
| Template comparison (this system) | Pure deep learning | |
|---|---|---|
| Data needed | One master template + a few good samples | Hundreds to thousands of labelled defects |
| Small defects | Precise — down to a few dozen pixels | Detection rate unstable on tiny defects |
| Explainability | Defect location, area and type are explicit | A black box |
| Time to production | Days | Weeks to months |
| Best fit | The same layout, printed repeatedly from a fixed position | Many layouts, or no template at all |
When you print the same label layout over and over from a fixed camera position — which is the normal case on a line — template comparison is the most mature, most stable and most explainable route in industrial inspection. Deep learning is kept for later as a complement for irregular, texture-like defects; it is not the main path.
1 | Input (from a file, or straight from the camera) |
1 | algorithm score (0–10) --weighted--> region score (0–10) |
Why the overall result is a veto
A good total does not mean a good label. If one critical region fails, an average can still look healthy because the other regions scored full marks. So the score is a weighted average, but any single failing region forces an overall FAIL. The weakest link decides — the same rule a barcode grader uses.
Every weight and threshold is adjustable in the template editor, so you can tell the system which fields matter most and watch the score respond.
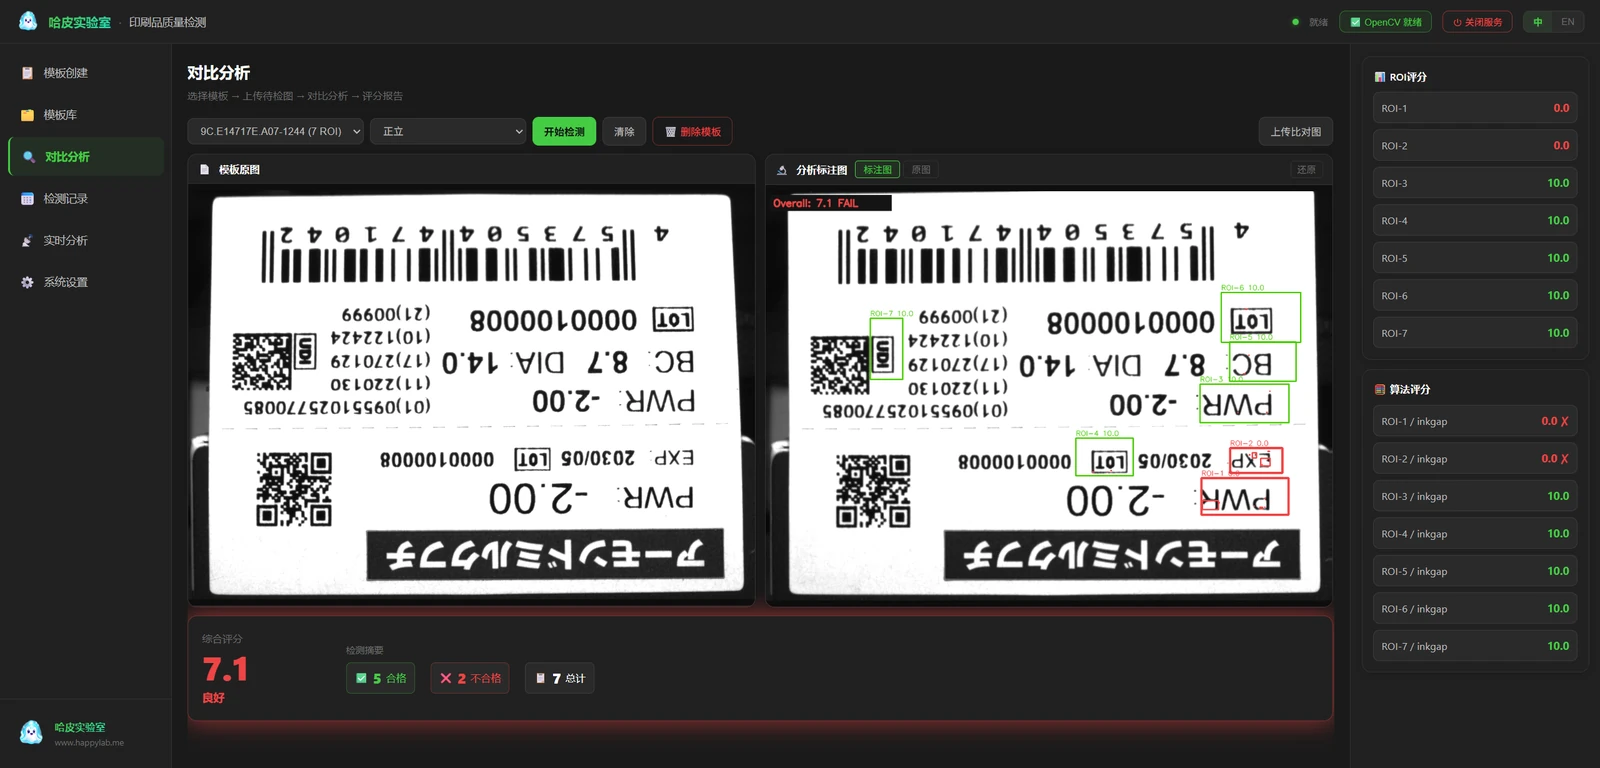
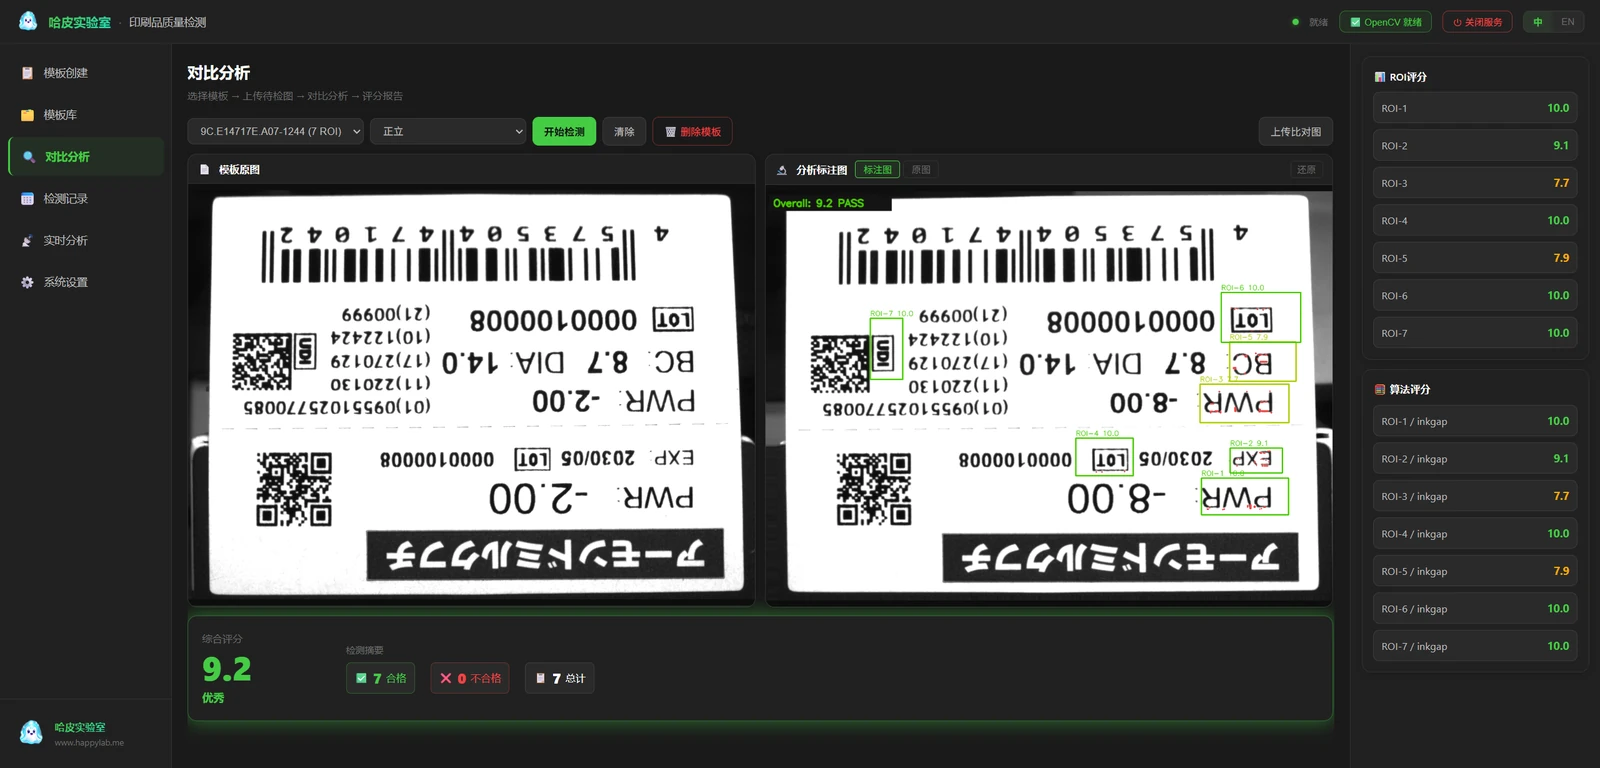
General-purpose tools — image differencing, connected components, skeleton analysis — cover most defects. Three jobs on a real line did not yield to them, and each became a dedicated algorithm. This is where most of the engineering went.
The first approach paired contours one by one. On real samples it over-rejected badly: a character like “R” loses a small piece at the top edge, its closed loop merges with the outside, the “hole” disappears, pairing fails — and the entire loop (thousands of pixels) is reported as missing ink. A perfectly good label is rejected.
inkgap abandons contour pairing and measures the overall ink difference instead: align the two images, then compare the ink masks as a whole, with the tolerance for “how much missing ink counts as a defect” exposed as a percentage (default: 2%).
Result on 16 real PWR samples: 16/16 correct — good labels below 0.8% missing ink, defects above 3.5%, a 2.7× gap between the two.
A colon region has two failure modes: a missing dot, or a dot printed too faint (too little ink). The old “ink dot density” metric was poor — it could not separate “one dot missing” from “a dot gone faint”, and it was sensitive to region size.
We ran a deliberately counter-intuitive test, comparing several metrics by how cleanly they separate good from bad:
| Metric | Worst good | Best bad | Separation | Verdict |
|---|---|---|---|---|
| Relative area | 0.0045 | 0.0030 | 1.50× | Works |
| Darkness alone (density) | 75.7 | 73.2 | 1.03× | ❌ Basically separates nothing |
Ink mass mass/span² |
0.394 | 0.163 | 2.42× | ✅ Best |
The finding: a “faint” dot is, at the pixel level, mostly a smaller dot — not an evenly lighter one. Darkness alone is useless (1.03×); the combined quantity — area × darkness, normalised by the dot spacing — separates best (2.42×).
So the colon is not asked “does it line up with the template?” It is asked “are both dots big enough and dark enough?“ That makes it naturally immune to shift, to scale — and even to a 180° rotation, because a colon is symmetric top to bottom.
Result: 20/20 on clean samples, 20/20 with stray character fragments intruding, 11/11 end-to-end through the full pipeline.
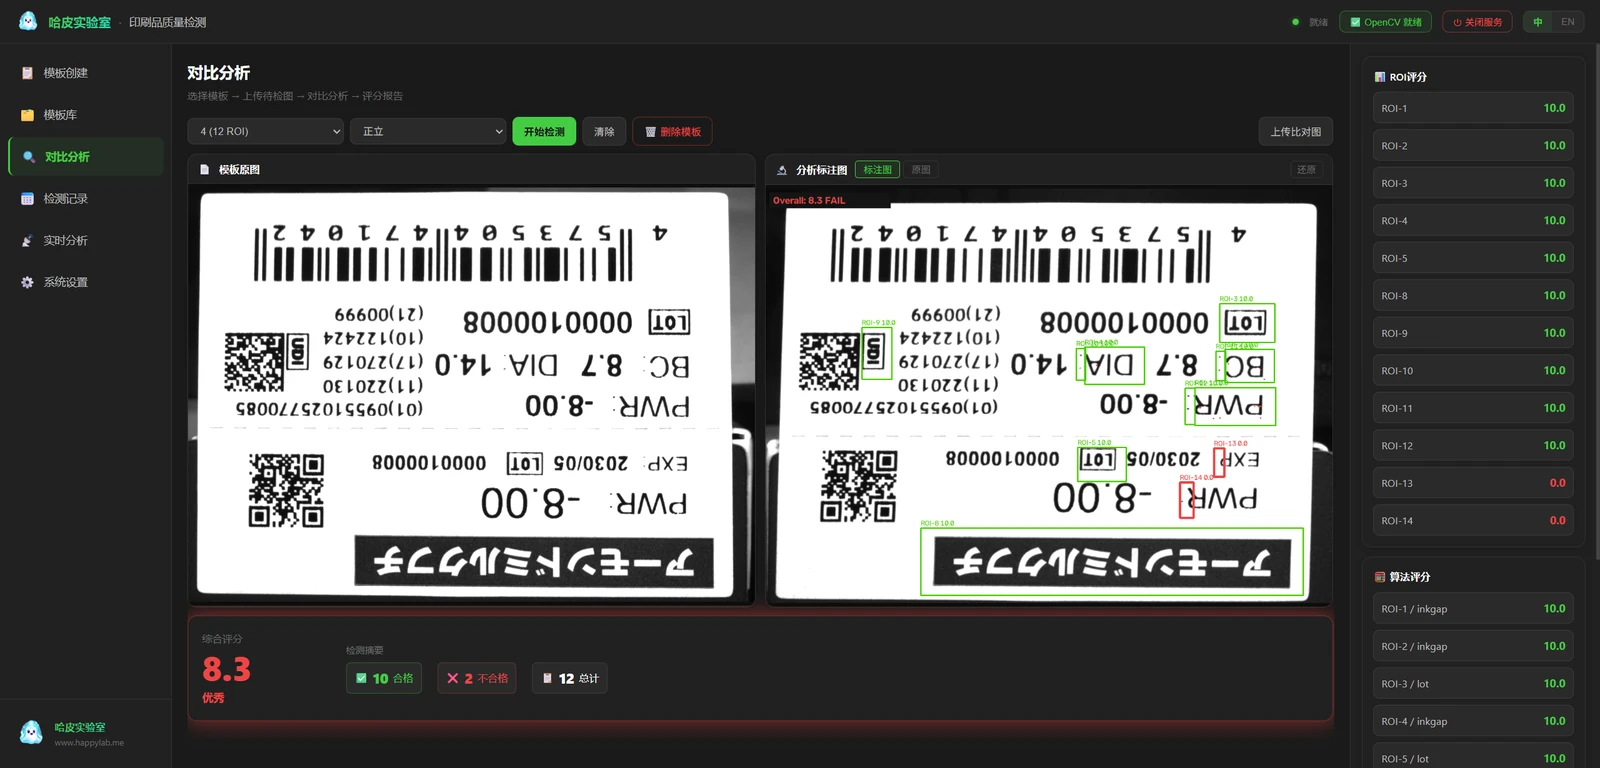
The LOT label is a black frame around three letters (L, O, T), usually scanned upside down. The main defects are a broken or faded frame.
The old approach aligned the images with ECC (grayscale cross-correlation), which drifts and often lines the letters up wrong. So we changed the anchor: the black frame is the highest-contrast, most rigid thing in the image — it is the most reliable reference available.
| Alignment method | Shift (15,10) | Shift (-25,20) | Ink density change |
|---|---|---|---|
| Frame-anchored | 0.00 px | 0.00 px | Immune |
| ECC | 0.26 | -1.00 (collapses) | Sensitive |
The complication is that the frame itself is a defect candidate — how do you align with a frame that may be broken? The answer is robust frame fitting: start from a minimum-area rectangle, then refine each of the four edges by least squares, falling back to the initial edge where the frame is missing. Broken frames are tolerated; the fit stays sub-pixel.
Result on 26 samples: 24/26 overall (13/13 good labels pass, 11/13 defects caught), with 26/26 frame fits accurate to under 0.2 px.
Once the system was running, a customer sent 133 images captured on their actual line with a blunt note: “the defects are mostly caught, but the offset causes false alarms.”
Our first instinct was a plausible one: “the label crop must not be tight enough — the background is black and the label is white; if we cut the label out cleanly, like a Photoshop selection, that would fix most of the offset.”
It made sense. So instead of building it, we tested it — and the data killed it.
“Cut the label out precisely” turns out not to help. Four more precise cropping methods, all no better than what we had:
| Method | Pass rate |
|---|---|
| Current (white threshold → close → largest component + margin) | 16% |
| Content-box crop | 11% |
| Ink-bbox crop | 11% |
| Rotated-rectangle correction | 15% |
The data was clear: the label’s position varies by a standard deviation of only 8.3 px, its size by 4.6 px — it was already being cropped accurately. Two consecutive captures matched at NCC 0.9995 with 0 px shift — the camera and the label are remarkably stable. Cropping was already near-optimal; it was never the bottleneck.
So the hunch was wrong. The real cause was elsewhere.
The culprit was one line inside registration. The old code took the full affine solution from ECC and projected it down to a similarity transform (uniform scale + rotation + translation only). That step threw away real anisotropic and perspective information — the label sitting slightly off-plane, the camera not perfectly square-on — and amplified the global registration residual by 2.4×. A narrow 21 px region like the colon was pushed out of its box and flagged. Removing that projection fixed it:
| Metric | Before | After |
|---|---|---|
| Overall PASS | 20% | 23% |
| Failing regions | 305 | 195 (−36%) |
| Colon failures | 142 | 95 (−33%) |
| Time per image | ~0.78 s | ~0.78 s (no cost) |
What this episode is really about
An “offset” that looked like a hardware or capture problem turned out to live in a single mathematical projection. And a plausible-sounding fix — a clean crop — was disproved by the data before a line of it was written.
On the line, proving your own hypothesis wrong first, then localising with data, is worth far more than changing things on instinct.
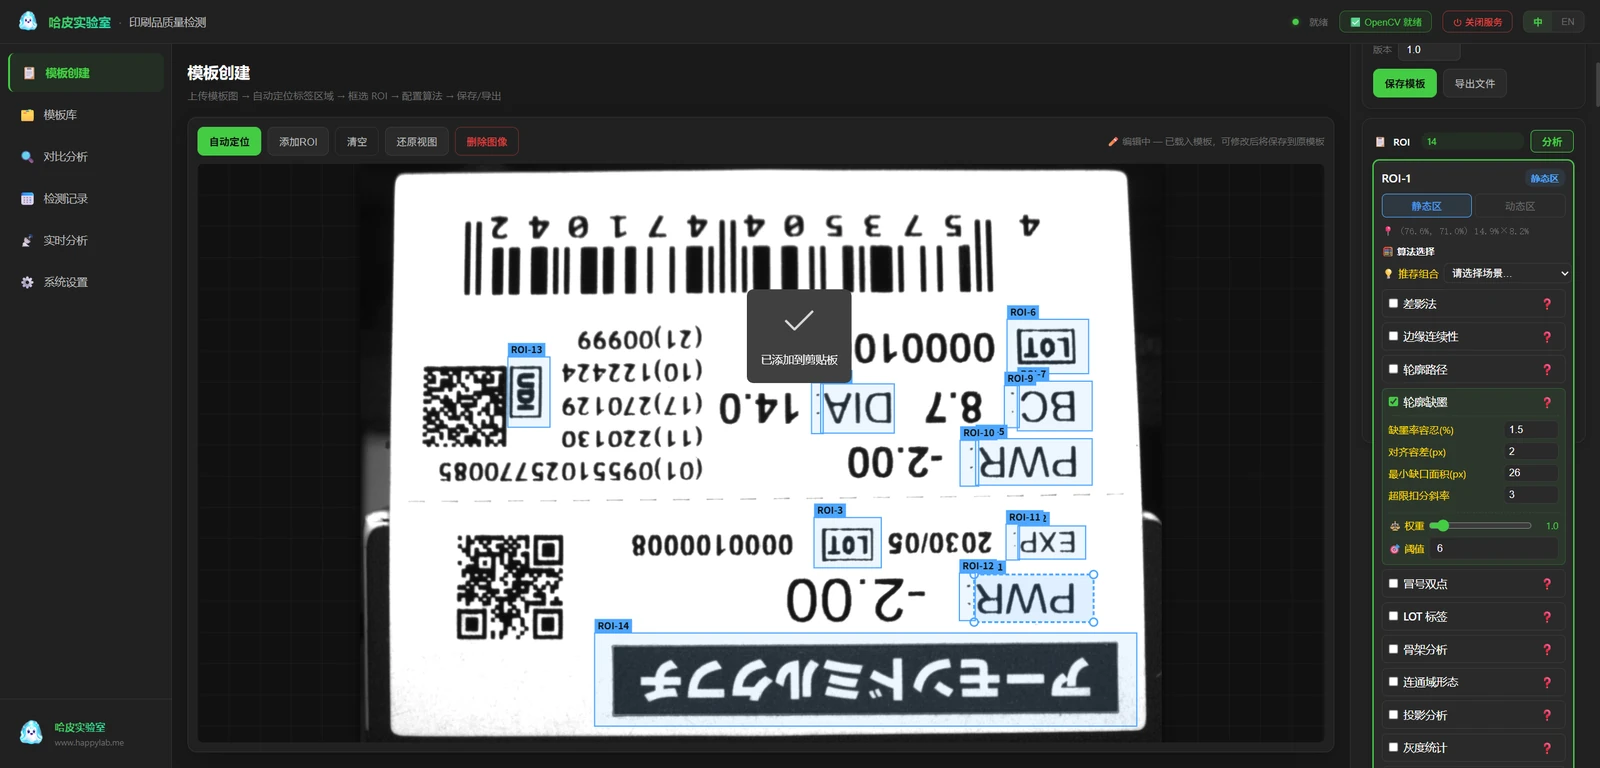
The production build runs unattended:
1 | Industrial camera --FTP--> image intake → auto-inspection queue → engine → record |
The line controller connects over TCP and uses three commands: list (get the template list), select (switch to a template for a changeover) and result (receive the per-region scores for each image, for accept/reject or alarm). Switching product = one command from the controller; nobody walks to a screen.
| Scenario | The pain | How it helps |
|---|---|---|
| 🏭 Contact-lens / medical labels | A missing stroke on a key parameter is a compliance risk | Template comparison, region-by-region pixel-level detection |
| 🏷️ Label printing, pre-shipment | Missing ink, broken lines and missing borders are hard to self-check | Build a template yourself; one click for a scored report |
| 🔍 Mixed-product lines | Every layout change means re-calibration | One template per product, switched by the controller |
| 📦 Incoming and spot checks | Manual standards vary | One fixed criterion, archived and traceable |
Dedicated print-inspection systems are usually sold as a hardware-plus-software package, often with a subscription, and commonly run into five figures. Machine-vision software seats are priced per seat and grow fast with add-ons. This is a different kind of product: software that runs on hardware you already have, at a fraction of that.
| Dedicated inspection system | Machine-vision software seat | HappyLab Label Inspection | |
|---|---|---|---|
| Hardware | Integrated camera, lighting, encoder | PC, camera, licences | Your camera, or a photo |
| Pricing model | Often a subscription | Per seat, plus add-ons | One-time |
| Time to production | Weeks | Weeks | Days |
| Runs offline | ✅ | ✅ | ✅ |
| Explainable result | Varies | Varies | Defect location, area and type shown |
$800, one-time, permanent. No subscription, nothing to renew. Custom work — a new report format, integration with your MES/ERP, an added language, a tailored workflow — is quoted separately. Full details are on the Label Inspection pricing page.
We are not trying to match the feature list of a five-figure platform. We are making it possible for a line to inspect labels properly, today, at a price that does not need a capital-approval meeting.
Reference-grade inspection, calibrated on your samples
This is template-comparison inspection. It is not a universal AI that works out of the box, and it must be calibrated on your product before it goes on a line — that calibration is what sets the detection rate and the false-alarm rate.
Send us a photo of a good label and one of a bad one, and we will tell you what the inspection would have caught. To see it in action, open the online inspection tool.
Related reading: Barcode Quality Grading covers the grading engine this inspector reuses, and Fixed-Mount OCR V2 shows the same line-side approach combining character reading with quality grading.
Tell us what you print and what you need to catch, and we will set up a fast, tailored version — including a calibration run on your own samples.
📧 sales@happylab.me · 🌐 global.happylab.me
HappyLab builds practical AI and browser-based tools for industrial device workflows.
Next

The hardest part of site work is not the work. It is getting a message to the ri...
HappyLab shared on Oct 12, 2026